کیسے کریں اور انداز
Subscribe to our movie channel!
Free Session ► https://goo.su/lFek1W
For copyright matters please contact us at: [email protected]

Barbed Wire Stitching Fishtail Paracord Bracelet Tutorial
#paracord_bracelet #DIY_paracord #paracord #how_to_make_paracord
Aloha everyone, in this Video Tutorial you'll see Barbed Wire Stitching Fishtail Paracord Bracelet Tutorial Paracord Knot Tutorial DIY
Paracord used:
Gold micro cord - 5 ft or in metric 1.5 mt
Black Paracord 550 - 9.2 feet or in metric 2.8 mt
Buckle 5/8
Wrist circumference 7.5 inches or 19 centimeters
Consider becoming a patron and support us at https://www.patreon.com/AlphaOne982
Thanks!
Stuff we used in this video:
Runic beads:
https://amzn.to/3nc0eWy
https://amzn.to/3FfS5Xu
Our Paracord 550 we buy at:
https://amzn.to/36NgYZJ
https://amzn.to/30jgEQ6
https://amzn.to/2NlHrFZ
Our Microcord at:
https://amzn.to/3i62Lwf
https://amzn.to/3wrm8dg
https://amzn.to/3wmyfYX
https://amzn.to/3MtxMJV
Paracord JIG at:
https://amzn.to/30eq5jD
https://amzn.to/2QNi41T
Paracord Buckles at:
https://amzn.to/35IHl1H
https://amzn.to/2QL3pEA
https://amzn.to/2tRmMTl
https://amzn.to/2tRmJqD
Paracord FID Lacing Needles at:
https://amzn.to/37Z2whl
Paracord Torch Lighter at:
https://amzn.to/2R9PQxh
https://amzn.to/30fiUHP
Canon EOS 7D Mark II
https://amzn.to/3869m4V
Lights:
https://amzn.to/2QQcKuV
Credit for this bracelet stitching pattern to Ted Potter www.instagram.com/designer_paracord
How to Make The Endless Falls Paracord Bracelet Fast Simple Easy
https://youtu.be/jG_6ZbX37IY
Beautiful Paracord Bracelet - Fast, Simple & Easy to Make - Paracord Knot Tutorial
https://youtu.be/BQmLTkJCg80
How to Make a Paracord Bracelet Chain Links Paracord Knot Tutorial https://youtu.be/zCEn7bS1-fo
Paracord for Beginners 4 Strand Core Double Cow's Hitch Paracord Bracelet Base Tutorial https://youtu.be/80RIVwpjo7o
How to Make a Paracord Bracelet XOXO Bar Paracord Knot Tutorial for Beginners https://youtu.be/TtzLqWDqc4A
How to Make a Paracord Bracelet Sanctified X Knot Paracord Tutorial https://youtu.be/4J81FWE4MAY
How to Tie an Awesome 6 Strand's Paracord Bracelet Core https://youtu.be/cWRQavRVlfc
How to Make Ringed Cobra Knot Paracord Bracelet Tutorial DIY https://youtu.be/WktCYkvbJJc
How to Make Golden Sanctified Chainmail Endless Falls Knot Paracord Bracelet Knot Tutorial DIY https://youtu.be/Jn-KqoY9rd8
How to Make a Paracord Bracelet Solomon Belly Bar Paracord Knot Tutorial DIY https://youtu.be/U5cxXTEMxaQ
How to Make a Paracord Bracelet Tarantula Bar Paracord Knot Tutorial DIY https://youtu.be/lkBxutyXQNo
How to Make a Paracord Bracelet Rock Modified Paracord Knot Tutorial DIY https://youtu.be/fSui8Jb3JZo
How To Make a Paracord Bracelet Sanctified Chain Mail Endless Falls Paracord Bracelet Tutorial DIY https://youtu.be/9GZ5wgXT3GA
Paracord Bracelet Twisted Fusion Bar https://youtu.be/auiIachhPAs
Mated Wall Knot https://youtu.be/Gms5IVVLBvM
Rune Stone https://youtu.be/DgueENSNT6A
Noble Heart Bar https://youtu.be/lYHcqdHe1ZI
Chained Endless Falls https://youtu.be/c7Laik4wimg
Darksiders https://youtu.be/-RvZ_s8h0zY
Celtic Bar Paracord Bracelet https://youtu.be/N2rWFNWOdVg
4 strands core https://youtu.be/FYOdowWCCGQ
Rune of Destiny https://youtu.be/4OzzJYFv9TU
Check Our Recent Paracord Projects
https://youtu.be/uP-SSW_xf0Y
https://youtu.be/ePH6Dfbii0s
https://youtu.be/p4Lnds164To
Check Our Ultimate Paracord Wallet Projects
https://youtu.be/W3rt9TlMhn4
https://youtu.be/kesbq6zxZFU
Store your cords in a Paracord Donut!
Paracord Donut Tutorial https://youtu.be/rpMrgplrgJw
Recommended video:
https://youtu.be/NjYeb1a4b5E
Survival videos You might like:
https://youtu.be/Nl3pCc6H-Vg
https://youtu.be/xivsHxLvDJc
https://youtu.be/GEG7rcfTLoE
https://youtu.be/C0dk1vpYrBw
https://youtu.be/gEnomhN4Gsk
https://youtu.be/Gxgv9tKrlVU
Recommended video:
https://youtu.be/GrykmXRUQIQ

WOE Recommended Tools and More ▶https://www.amazon.com/shop/theweaversofeternity
Buy Great Quality Paracord Here ▶ https://amzn.to/2GkJplH
Knotter's Tool ▶ https://amzn.to/2IscoaI
Paracord Fids ▶ https://amzn.to/2IscoaI
Paracord Jigs ▶ https://amzn.to/2HxzdVz / https://amzn.to/2Dkv9ZF
Buy Great Quality Paracord Here ▶ https://amzn.to/2sWtJi2 (Affiliate Canada)
Titan Survival Survivorcord "The Ultimate Survival Paracord" ▶ https://goo.gl/vs8Qct (Affiliate)
Merchandise Now Available
▶ https://teespring.com/stores/weaversofeternity
Support This Channel on Patreon ▶ https://www.patreon.com/weaversofeternity
Try Amazon Prime 30-Day Free Trial ▶ http://amzn.to/2agix4E (Fast, FREE shipping and more!)
----------------------------------------------------------------------------------------------------------------------------------------
Hey Weavers! I was inspired by last week's Conquistador Ring tutorial to make this single closed loop Conquistador paracord bracelet. We're using some elastic shock cord to make this bracelet a closed loop so that you can slip the bracelet on and off. The shock cord allows the bracelet to be a bit smaller and still fit somewhat nicely while not having a clasp to open and close it. For reference, my wrist is 7" in circumference and the bracelet I made is 7.25" in circumference. You can definitely play around with the ratio of paracord to shock cord for this bracelet. Hope you all try this one out! Let me know what you think in the comment section!
----------------------------------------------------------------------------------------------------------------------------------------
Related Tutorials:
2-Strand Buckle Core (Single Hitch): http://bit.ly/2cLyeG4
2-Strand Buckle Core (Double Cow's Hitch): http://bit.ly/2aZSORX
4-Strand Buckle Core (Double Cow's Hitch): http://bit.ly/2cvkGwX
6-Strand Buckle Core (Double Cow's Hitch): http://bit.ly/2cpUlO5
Diamond Knot: http://bit.ly/1woPIgl
Contained 4-Strand Core: https://bit.ly/2YY9MGA
Welcome to The Weavers of Eternity official paracord tutorial channel! Here you'll find paracord tutorials, videos, tips, tricks, and lessons on everything related to paracord weaving, paracord bracelet making, knot tying, and paracord education. Please enjoy your stay and subscribe for new content on a weekly basis.
For more WOE content check out:
WOE Website/Blog: http://www.weaversofeternity.com
WOE Instagram: www.instagram.com/weaversofeternity
Weavers of Eternity Facebook: http://on.fb.me/1zEsEps
Fraternity of Weavers Facebook Group: http://on.fb.me/1uinNeu
Pinterest: https://www.pinterest.com/weaverseternity/
Channel Link: https://www.youtube.com/user/TheWeaversofEternity/
* We are a participant in the Amazon Services LLC Associates Program, an affiliate advertising program designed to provide a means for us to earn fees by linking to Amazon.com and affiliated sites.
#paracord #weaversofeternity

Monkey Smash! Make A MEGA Monkey's Fist Impact Tool In This Tutorial!
WOE Recommended Tools and More ▶https://www.amazon.com/shop/theweaversofeternity
[Affiliate Links]
Buy Great Quality Paracord Here ▶ https://amzn.to/3GCW4xW
8-Ball ▶ https://amzn.to/2O8lt9a
OD Green Carabiners ▶ https://amzn.to/2KerorR
Monkey's Fist Jig ▶ https://amzn.to/2G8OvSj
Knotter's Tool ▶ https://amzn.to/2IscoaI
Paracord Fids ▶ https://amzn.to/2IscoaI
Paracord Jigs ▶ https://amzn.to/2HxzdVz / https://amzn.to/2Dkv9ZF
Canada Paracord ▶https://tinyurl.com/ty23ene [Affiliate]
Buy Great Quality Paracord Here ▶ https://amzn.to/2sWtJi2 [Affiliate Canada]
Titan Survival Survivorcord "The Ultimate Survival Paracord" ▶ https://goo.gl/vs8Qct (Affiliate)
Merchandise Now Available
▶ https://teespring.com/stores/weaversofeternity
Support This Channel on Patreon ▶ https://www.patreon.com/weaversofeternity
Try Amazon Prime 30-Day Free Trial ▶ http://amzn.to/2agix4E (Fast, FREE shipping and more!)
----------------------------------------------------------------------------------------------------------------------------------------
Hey Weavers! In this episode we will be making a Mega Monkey's Fist Impact Tool! This giant monkey's fist uses an 8-Ball as the core and makes a very hefty monkey's fist. You can use this impact tool for things such as tenderizing tough steaks, taking down drywall, or smashing fruit. Hope you all like this video and will try making one!
Wide Diamond Knot: https://youtu.be/2xy1m5X8iTE
TIMESTAMPS:
0:00 Intro
0:38 Paracord And Materials Required
1:02 Wrapping the 8-Ball On Jig (1st Pass)
2:14 Wrapping 2nd Pass
2:54 Wrapping 3rd Pass
4:25 Removing From Jig and Cinching Slack Out
5:37 Tying Wide Diamond Knot
7:29 Tying 4 Strand Round Braid Lanyard
8:40 Transitioning From Braid To Cobra Knot
9:21 Snipping And Melting Excess Cord
9:33 Attaching Carabiner
10:19 Tying King Cobra Knots Over Lanyard
10:50 Snipping And Melting Excess Cord
11:14 Conclusion
----------------------------------------------------------------------------------------------------------------------------------------
Related Tutorials:
2-Strand Buckle Core (Single Hitch): http://bit.ly/2cLyeG4
2-Strand Buckle Core (Double Cow's Hitch): http://bit.ly/2aZSORX
4-Strand Buckle Core (Double Cow's Hitch): http://bit.ly/2cvkGwX
6-Strand Buckle Core (Double Cow's Hitch): http://bit.ly/2cpUlO5
Diamond Knot: http://bit.ly/1woPIgl
Contained 4-Strand Core: https://bit.ly/2YY9MGA
Welcome to The Weavers of Eternity official paracord tutorial channel! Here you'll find paracord tutorials, videos, tips, tricks, and lessons on everything related to paracord weaving, paracord bracelet making, knot tying, and paracord education. Please enjoy your stay and subscribe for new content on a weekly basis.
For more WOE content check out:
WOE Website/Blog: http://www.weaversofeternity.com
WOE Instagram: www.instagram.com/weaversofeternity
Weavers of Eternity Facebook: http://on.fb.me/1zEsEps
Fraternity of Weavers Facebook Group: http://on.fb.me/1uinNeu
Pinterest: https://www.pinterest.com/weaverseternity/
Channel Link: https://www.youtube.com/user/TheWeaversofEternity/
* We are a participant in the Amazon Services LLC Associates Program, an affiliate advertising program designed to provide a means for us to earn fees by linking to Amazon.com and affiliated sites.
#paracord #weaversofeternity
Last year I built a portable wood fired pizza oven that didn't really work. So I decided to redeem myself by 1: blowing up the old pizza oven; and 2: building a new brick pizza oven that can cook a pizza fast easily. Full pizza oven step-by-step build video with narration.
Materials:
Pizza Peel: https://amzn.to/3962Lxg
Barbecue Brush: https://amzn.to/3O6flvu
Sand Concrete Mix
Portland Cement
Perlite: https://amzn.to/3NEtxvI
Mortar Mix
Concrete Thin Bricks: https://www.kijiji.ca/v-renova....tion-flooring-wall/c https://www.homedepot.com/p/Ol....d-Mill-Brick-Brickwe
Greenhouse Dome:
In this video we show you how to build an earthen oven. Wood-fired earthen ovens are easily documented all the way back the ancient Romans. Likewise, they are easily documented in archaeological evidence and first-hand accounts from the 18th Century. We show you how easy it is to build one. #townsendovens
#townsendsearthenoven
Help support the channel with Patreon ▶ https://www.patreon.com/townsend ▶▶
Check Out Our Brand New Website! ▶ http://www.townsends.us/ ▶▶
Twitter ▶ @Jas_Townsend
Facebook ▶ facebook.com/jas.townsend
Instagram ▶ townsends_official
(Turn on captions [CC] in the lower right corner for more information while viewing.)
I made a brick mold that makes bricks 25 x 12.5 x 7.5 cm from wood. A log was split and mortise and tenon joints were carved using a stone chisel and sharp rocks. The mold was lashed together with cane to prevent it from coming apart when used.
Next, I made a mixture of mud and palm fiber to make the bricks. This was then placed into the mold to be shaped and taken to a drying area. 140 bricks were made.
When dry, the bricks were then assembled into a kiln. 32 roof tiles were then made of mud and fired in the kiln. It only took 3 hours to fire the tiles sufficiently. The mud bricks and tiles were a bit weaker than objects made from my regular clay source because of the silt, sand and gravel content of the soil. Because of this, I will look at refining mud into clay in future projects instead of just using mud.
Interestingly, the kiln got hot enough so that iron oxide containing stones began to melt out of the tiles. This is not metallic iron, but only slag (iron oxide and silica) and the temperature was probably not very high, but only enough to slowly melt or soften the stones when heated for 3 hours.
The kiln performed as well as the monolithic ones I've built in the past and has a good volume. It can also be taken down and transported to other areas. But the bricks are very brittle and next time I'd use better clay devoid of sand/silt, and use grog instead of temper made of plant fiber which burns out in firing. The mold works satisfactorily. I aim to make better quality bricks for use in furnaces and buildings in future.
Wordpress: https://primitivetechnology.wordpress.com
Patreon page: https://www.patreon.com/user?u=2945881
I have no face book page, instagram, twitter etc. Beware of fake pages.
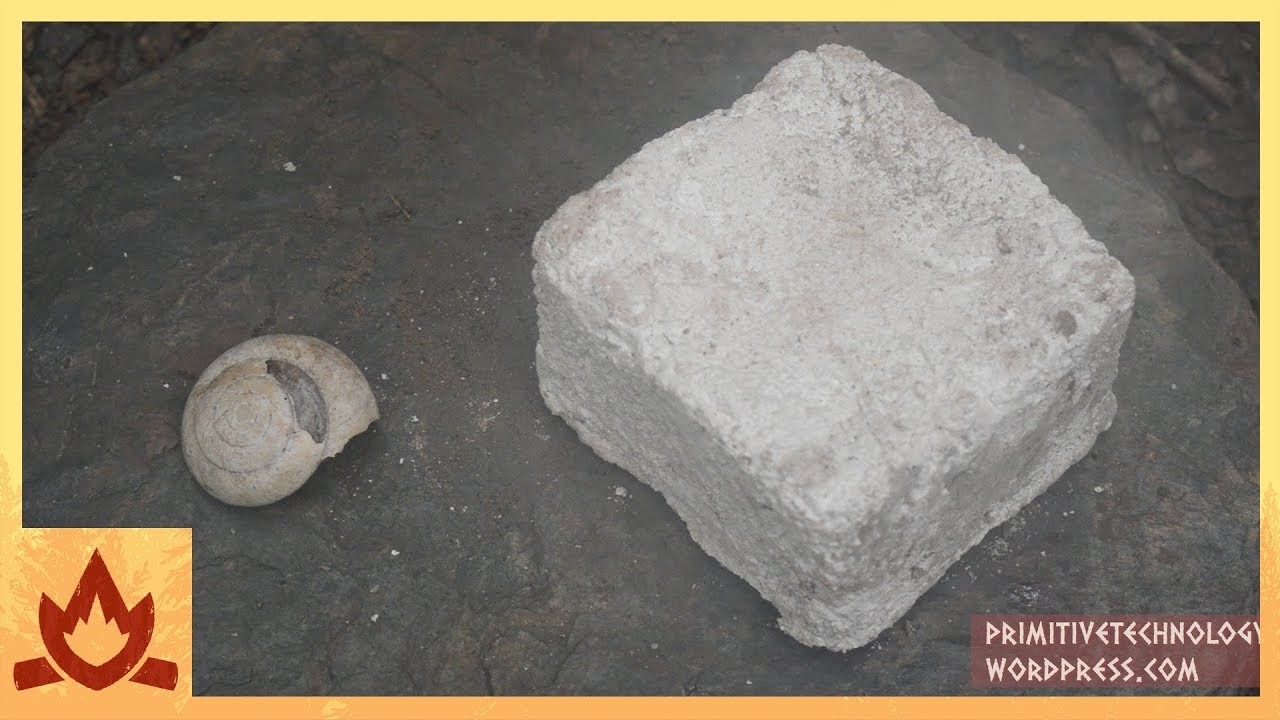
At the old hut site (the new one being temporarily cut off by flooding) I made lime mortar from the shells of rainforest snails by firing them in a kiln, slaking them in water, mixing them into lime putty. Limestone is basically calcium carbonate (CaCO3). The general source of lime is limestone and various other calcareous minerals, though shells, egg shells and coral are other sources of lime (for more information see video on Corporals Corner channel: https://youtu.be/tOhAfaFboNU or Skillcults channel: https://youtu.be/jOxaOTUGuKo). When heated above 840 degrees Celsius, the lime decomposes into calcium oxide (CaO) or Quicklime and releases carbon dioxide (CO2). When water is added to the quicklime it becomes calcium hydroxide Ca (OH)2 or lime putty. From here the calcium hydroxide can then be shaped into a form and allowed to set. Carbon dioxide enters the lime putty as it dries causing it to turn back into calcium carbonate. The new calcium carbonate has then set, remaining solid and water resistant.
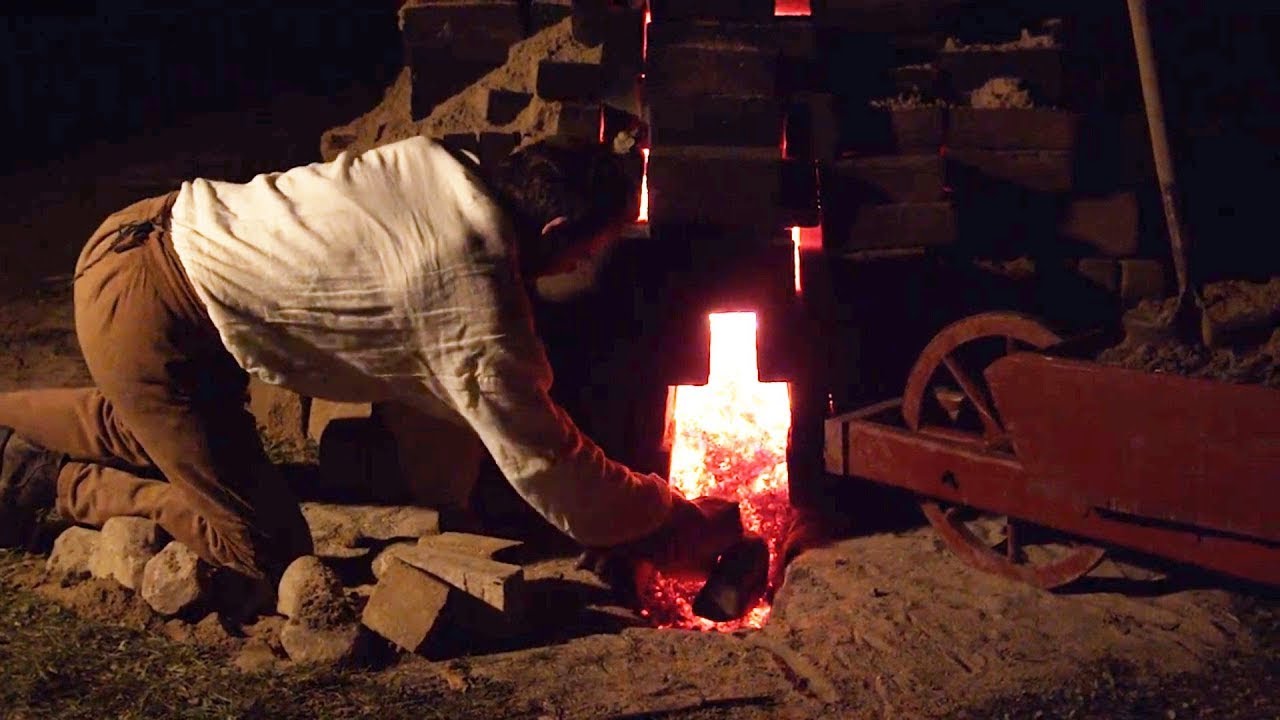
In my local geography, calcareous rocks such as limestone are absent leading to a difficulty in acquiring the feed stock for lime making. However, I was still able to make lime by collecting the shells of large terrestrial snails that are native to the rainforest here. The unoccupied shells of these snails were gathered up and stored at the hut. Fire wood was gathered and packed neatly into the kiln. Importantly, the firewood was stacked on top of the grate rather than underneath it in the firebox as is the normal procedure for firing pottery. Using an ordinary updraft pottery kiln in this configuration allows it to reach much higher temperatures than would be possible during normal use. The wood was lit from above and the fire burned down towards the grate. Alternate layers of shells and wood were added on to this burning fuel bed. After adding the last layer of wood to act as a “lid” to prevent heat loss from above I left the kiln to finish on its own, unsupervised. The whole process took about an hour and a half.
When the kiln had cooled down a few hours later, I took out the calcined shells. Not shown in the video was the fact that some shells got so hot, the dirt stuck to them turned into slag and fused to them, possibly with the lime acting a flux lowering its melting point. This extreme heat (+1200 c) should be avoided as the over burnt lime becomes “dead lime”, unable to slake in water. Most shells were still useable though. They were taken out of the kiln and had water added to them. An exothermic reaction then ensued. Heat was produced as the lime quicklime turned into slaked lime. The water heated up creating steam and the shells decomposed into a white paste. The paste was stirred and crushed pottery was added to it as an aggregate (sand is normally used for this, I just had a lot of old pot sherds lying about to dispose of). This lime mortar mixture was then formed into a block shape and left to dry. It took about a week and a half to set as we have had extremely humid, wet weather. The block was observed to have set demonstrating its properties.
What I created is actually lime mortar, typically used for mortaring bricks and tiles together. It’s basically the ‘Glue’ that holds together the building blocks of masonry structures. From my research 20 kg of lime mortar is used on a 1 m square section of brick wall. 5 kg of lime to 15 kg of aggregate (sand, grog etc.) per a 1 m square section of bricks. The shells, though large, are not terribly abundant. A method for finding shells efficiently needs to be made before considering making lime mortar in this fashion. From my experience sand bars in a creek sometimes accumulate snail shells from higher up in the mountains. In these spots, water velocity decreases and shells in the water tend to drop out of the water column. Additionally lime may be partially replaced with ordinary wood ash in mortar without a corresponding decrease in strength. To conclude, making lime in a land without limestone is possible but can be problematic when trying to do so on a large scale.
Wordpress: https://primitivetechnology.wordpress.com
Patreon page: https://www.patreon.com/user?u=2945881
I have no face book page, instagram, twitter etc. Beware of fake pages.

An Attempt at Reproducing Ancient Roman Concrete by using Limestone, Volcanic Ash and Aggregate. Please Hit The LIKE and SUBSCRIBE BUTTONS as well as the NOTIFICATION BELL. Feel Free to Check out my Amazon Influencer Page and Follow Me on Instagram, Facebook and Twitter. Thanks For Watching.
Amazon https://www.amazon.com/shop/corporalscorner?isVisitor=true&ref=exp_inf_own_pub_corporalscorner
Self-reliance Outfitters https://www.selfrelianceoutfit....ters.com/collections
Facebook https://www.facebook.com/pages..../Corporals-Corner/51
#corporalscorner #shawnkelly #campinginthewoods

Visit Our Website! ➧ http://www.townsends.us/ ➧➧
Help support the channel with Patreon ➧ https://www.patreon.com/townsend ➧➧
Facebook ➧ facebook.com/jas.townsend
Instagram ➧ townsends_official
The final step in our handmade, brick-making process.
Visit Our Website! ➧ http://www.townsends.us/ ➧➧
Help support the channel with Patreon ➧ https://www.patreon.com/townsend ➧➧
Facebook ➧ facebook.com/jas.townsend
Instagram ➧ townsends_official

Visit Our Website! ➧ http://www.townsends.us/ ➧➧
Matthew Patton's Diary https://www.townsends.us/produ....cts/diary-of-matthew
Help support the channel with Patreon ➧ https://www.patreon.com/townsend ➧➧
Facebook ➧ facebook.com/jas.townsend
Instagram ➧ townsends_official

There are 2 primary ways to process wild clay, wet or dry. I usually prefer dry processing my clay but it doesn't work for all clays, for different reasons, sometimes you need to wet process your clay. This video illustrates in detail how to wet process clay that you have dug from nature.
To learn all about finding, collecting and processing wild clay, check out my online masterclass, Wild Clay 101 - https://ancientpottery.how/courses/native-clay/
#wetprocessingclay
❤️ Support my channel
Channel membership https://www.youtube.com/c/ancientpottery/join
Ancient Potters Club https://ancientpottery.how/ancient-potters-club/
👕 T shirts and other merch - https://teespring.com/stores/a....ndy-wards-ancient-po
🛍 Shop for pottery related goodies
Classes, tools and pottery are available at my online store: https://ancientpottery.how/shop/
📚 Improve your pottery skills
Check out my in-person pottery workshops and online masterclasses to improve your pottery making skills. https://ancientpottery.how/classes/
⭐️ Social media
Facebook - https://www.facebook.com/andywardpottery
Instagram - https://www.instagram.com/ancientpottery/
📬 Send me mail
Andy Ward PO Box 43601 Tucson, AZ 85733
As an Amazon Associate I earn from qualifying purchases.
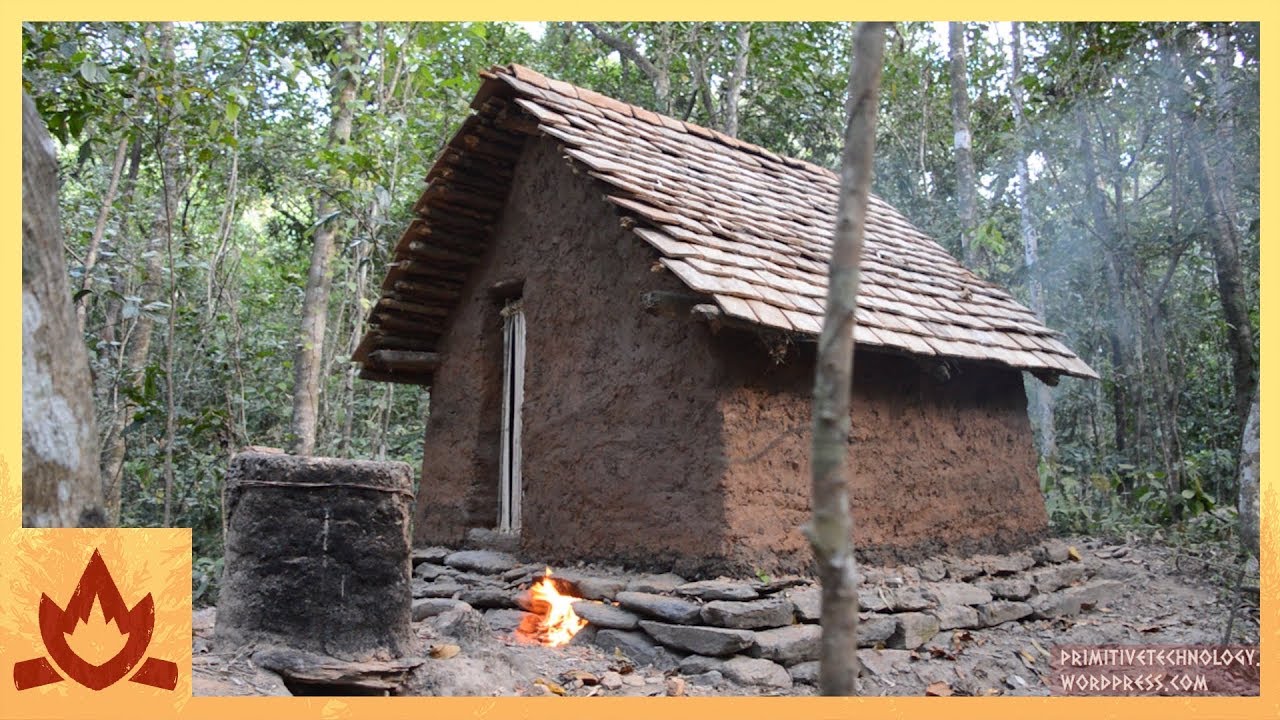
I built this tiled roof hut in the bush using only primitive tools and materials. The tools I used have been made in my previous videos. It should be pointed out that I do not live in the wild and that this is just a hobby. It should be obvious to most that this is not a survival shelter but an experiment in primitive building technology.
To cut and carve wood I used the celt stone axe and stone chisel made in this video. To carry water and make fire I used pots and fire sticks made in this video. Finally, to store fire wood and dry, unfired tiles, I used the wood shed built in this video.
The wooden frame was built with a 2X2m floor plan and a 2m tall ridge line with 1m tall side walls. 6 posts were put into the ground 0.25 m deep. The 3 horizontal roof beams were attached to these using mortise and tenon joints carved with a stone chisel. The rest of the frame was lashed together with lawyer cane strips. The frame swayed a little when pushed so later triangular bracing was added to stop this. Also when the mud wall was built, it enveloped the posts and stopped them moving altogether.
A small kiln was built of mud from the ground and a perforated floor of clay from the creek bank. It was only 25 cm internal diameter and 50 cm tall. Clay was dug, broken tiles (from previous batches) were crushed and added to it as grog and it was mixed thoroughly.This clay was pressed into rectangular moulds made from strips of lawyer cane to form tiles. Wood ash prevented the clay sticking to the stone. 20 tiles were fired at a time. 450 flat tiles and 15 curved ridge tiles were made with only a few breakages. 26 firings were done in all and the average firing took about 4 hours. The fired tiles were then hooked over the horizontal roof battens.
An underfloor heating system was built into one side of the hut to act as a sitting/sleeping platform in cold weather. This was inspired by the Korean Ondol or “hot stone”. A trench was dug and covered with flat stones with a firebox at one end and a chimney at the other for draft. The flames travelled beneath the floor heating it. After firing it for a while the stones stay warm all night with heat conducted directly to the sleeping occupant and radiating into the room.
The wall was made of clayey mud and stone. A stone footing was laid down and over this a wall of mud was built. To save on mud, stones were included into later wall courses. The mud was dug from a pit in front of the hut and left a large hole with a volume of about 2.5 cubic metres.
The finished hut has a swinging door made of sticks. The inside is dark so I made a torch from tree resin. A broken tile with resin on it acts as a small lamp producing a lot of light and little smoke. The end product was a solid little hut, that should be fire and rot resistant. The whole project took 102 days but would have taken 66 days were it not for unseasonal rain. For a more in depth description see my blog (https://primitivetechnology.wordpress.com/).
Wordpress: https://primitivetechnology.wordpress.com/
Patreon page: https://www.patreon.com/user?u=2945881&ty=h
I have no face book page. Beware of fake pages.
Hello everyone, my name is Duong.
I am 32 years old.
I live in a poor mountainous area of Vietnam.
From a young age, I had to work hard to help my parents.
Difficult life is always around, I work and learn everything from my grandparents and the old people in the village.
Gradually, I mastered the skills.
5 years ago, I decided to live the challenge.
Determined to learn about the primitive way of life, I chose to live in the wilderness, alone.
Where there's no technology and forcing yourself to pass, it feels great!
How about you? Your life is definitely different from mine.
Have fun watching the video!
Please send me ideas to gmail: [email protected]
-------------------------------------
PAYPAL: https://www.paypal.com/paypalme/primitiveskills
Follow Primitive Skills 😍👇
► Website: http://primitiveskills.net
► Fanpage Facebook : https://bit.ly/3Ep1Sve
► Facebook: https://www.facebook.com/duongskills
► Tiktok: https://vt.tiktok.com/ZSdBtpVWR/
► Twitter: https://twitter.com/PrimitiveTechn1
My other channels:
► Primitive Skills 2: https://bit.ly/38KzCan
► Triệu Huy Đường: https://bit.ly/3M9XSkF
---------------------------
© Copyright belongs to Primitiveskills.net
#primitiveskills
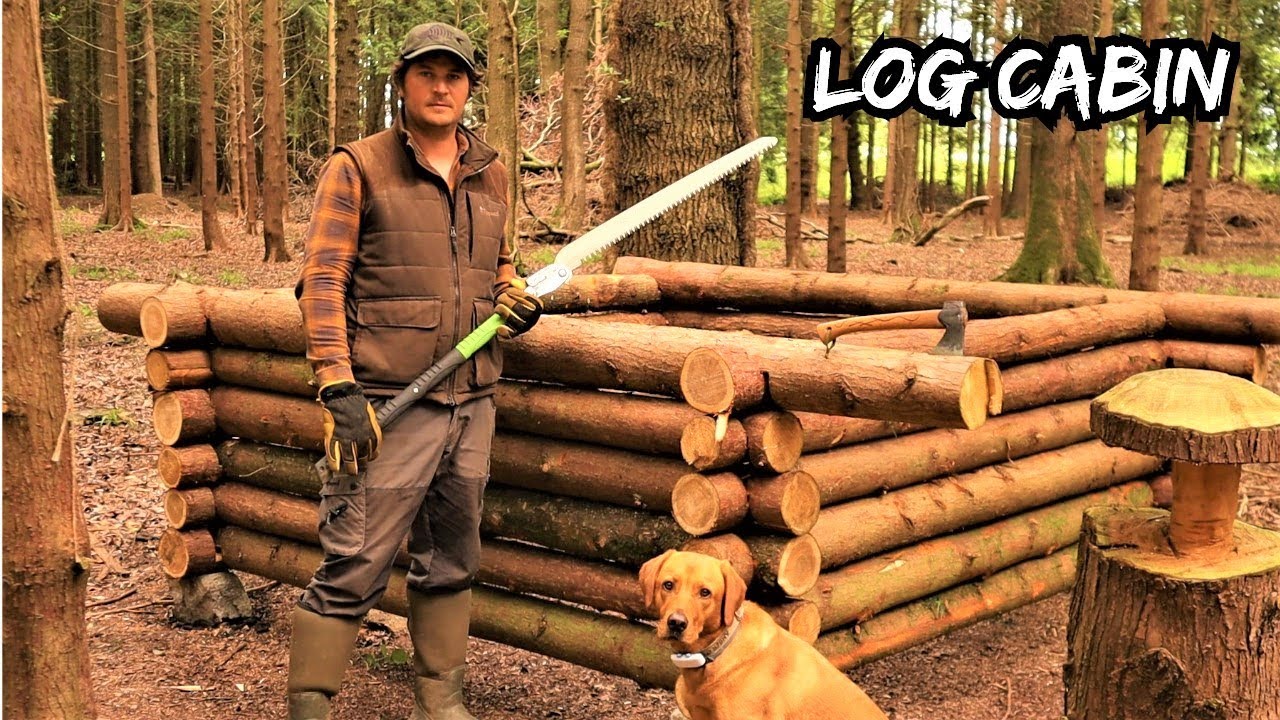
Bushcraft Survival Shelter Eco Project ep.1
Building an off-grid log cabin in the primitive bushcraft village using basic hand tools and lots of cedar wood!
Should I Thatch or Turf the roof? Let me know in the comments
PLEASE LET ME KNOW IF YOU LIKED THE VIDEO BY GIVING IT A 'THUMBS UP' AND DON'T FORGET TO SUBSCRIBE, THANKS!
JOIN THE LIVESTREAMS TOO...HIT THE BELL NOTIFICATION BUTTON AND CHAT TO ME LIVE!
HELP SUPPORT MY CHANNEL BY PURCHASING SOME MERCH
SPORKS / KUKSAS / CHOPPING BOARDS / FIRE PISTONS / T-SHIRTS and more http://www.bushcrafttools.com
JOIN MY BUSHCRAFT COURSES IN SOMERSET, UK:
Visit https://www.westcountrybushcraft.co.uk
FOLLOW ME ON INSTAGRAM:
https://www.instagram.com/bushcrafttools
FOLLOW MY DOG AMBER ON INSTAGRAM:
https://www.instagram.com/foxredamber/
Music: Bensound.com - Birth Of A Hero
🔔 Turn ON Notifications | Watch my Livestreams 👀
👍 LIKE | 💬 COMMENT | 👥 SHARE | 🙏 SUBSCRIBE
#logcabin #offgrid #bushcraft

http://www.selfrelianceoutfitters.com
http://astore.amazon.com/davecante-20
Dave Canterbury, David Canterbury, The Pathfinder School,Bush Craft ,Survival skills, Historical Lore, Primitive Skills, Archery, Hunting, Trapping, Fishing, Navigation, Knives, Axes, Fire, Water, Shelter, Search and Rescue

Essential Climbing Knots that can get you out of any situation.
And techniques how to tie them super fast and in a way that you will never forget.
00:00 Intro
00:27 Overhand Knot
00:42 Double Overhand / Stopper Knot
02:08 Tripple Overhand Knot
02:28 Scaffold / Poacher’s Knot
05:21 Double Fishermans Knot
07:17 Figure 8 - Follow Through
07:56 Figure 8 - On a Bight
10:31 Knot vs Hitch
10:59 Cloves Hitch
13:39 Munter / Italian Hitch
16:15 Friction Hitches
16:48 Prusik
18:28 Klemheist
20:26 Autoblock / French Prusik
21:42 Choosing a Prusik - Extras
23:51 If you wanna feel good
If you are getting value out of my videos and wanna feel good - consider supporting me: https://hardiseasy.com
Because that makes a big difference and is the main reason that allows me do this project!
Deep Thanks!
Ben

About MCQ Bushcraft & Wilderness Life.
Hi my names Mike and I live in Northern Sweden, Welcome to my channel! My videos cover Bushcraft, wilderness survival and outdoor skills, bushcraft gear like axes, knives, saws, backpacks, clothing systems, shelters and cooking gear. Fire lighting with natural tinders, fishing and hunting, slingshot hunting, ice fishing, mushroom identification and plant identification, catching and cooking wild game, foraging and cooking wild plants and mushrooms, wilderness cooking, weaving and basket making.
My Wife Megan and I also travel throughout northern europe overlanding in our modified 4x4 exploring wilderness tracks and roads. We left the UK almost one year ago to travel and relocate to the North of Sweden where we now live in a remote town surrounded by wilderness. Outside of our working lives we spend out time exploring the wilderness, ice fishing and regular fishing in the summer over lakes and rivers, we regularly hunt with rifles and shotguns for various bird species and we enjoy hiking and camping with our bushcraft kit but also further afield with our modified 4x4 and roof top tent.
Thanks for reading and checking out the channel and feel free to have a look at the playlists and videos below.
Mike and Megan ;)
Useful Links:
Amazon Gear Shop USA - https://www.amazon.com/shop/mcqbushcraft
Amazon Gear Shop UK - https://www.amazon.co.uk/shop/mcqbushcraft
Bushcraft Leatherwork Shop - http://www.mcqbushcraft.co.uk/shop/
Channel Merchandise - https://mcqbushcraft.teemill.com/
Follow me on Social Media:
Connect On My Website - http://www.MCQBushcraft.co.uk
Connect On Facebook - https://www.facebook.com/MCQBushcraft
Connect On Instagram - http://www.instagram.com/mcqbushcraft1
Connect On Twitter - http://www.twitter.com/MCQBushcraft
Latest Videos:
https://www.youtube.com/user/MCQBushcraft/videos
All Playlists:
Travelling Northern Europe - https://bit.ly/2Tudhpf
Bushcraft Sweden - https://bit.ly/2TFSo9Y
Craving - https://bit.ly/2Cr2DoP
Coastal Bushcraft - https://bit.ly/2Jhu75M
Bushcraft Basics - https://bit.ly/2HxUH8B
Bushcraft Axe Work - https://bit.ly/2TwJdJy
Camp Cooking - https://bit.ly/2u3ksWo
Bushcraft Camping - https://bit.ly/2XUHmNo
Bushcraft Equipment - https://bit.ly/2XRrjzH
Bushcraft Shelters - https://bit.ly/2TGzIXw
Bushcraft Containers - https://bit.ly/2J8DAwf
Bushcraft Clothing - https://bit.ly/2u68PO4
Bushcraft Fishing - https://bit.ly/2T0sn0H
Bushcraft Knives - https://bit.ly/2TwZpud
Hunting - https://bit.ly/2T0dqf4
Field Dressing Game - https://bit.ly/2TGCTOZ
Fire Lighting - https://bit.ly/2HgdEgC
Foraging and Wild Edibles - https://bit.ly/2EYrl07
Overland Build - https://bit.ly/2Hf2PeI

If you love butter, and want to enjoy a supply of it long after your means of refrigeration gives out, make Ghee or Clarified Butter and you may start wanting to use it in every recipe from here on!
Cheesecloth: http://amzn.to/2Gq1DC3
Ghee: http://amzn.to/2Gr1WMS
Wooden Spoons: http://amzn.to/2FQSxQM
Revere Ware Sauce Pans: http://amzn.to/2Gr28M6
Join this channel to get access to perks:
https://www.youtube.com/channe....l/UC2v8xZo6zTLytkBkD
PREPSTEADERS.com
Learn from the Past. Prepare for the Future.
Our Amazon Store & Recommendations:
https://amazon.com/shop/Prepsteaders
HARVEST RIGHT FREEZE-DRYER:
https://affiliates.harvestright.com/1155.html
Lehmans. For the Simpler Life.
https://www.pjatr.com/t/SENJR0....ZKTkpDSEdGR09JQ0dMRk
EMP SHIELD for Home & Vehicle:
https://www.empshield.com/?ref=PREPSTEADERS
SUN OVENS for Easy Outdoor Cooking:
https://www.sunoven.com/ref/cswartz0727/
CONNECT WITH US! We would love to get to know you! :)
http://www.Prepsteaders.com
http://www.Facebook.com/Prepsteaders
http://www.Twitter.com/Prepsteaders
http://www.Instagram.com/Prepsteaders
http://www.Pinterest.com/Prepsteaders
http://www.Patreon.com/Prepsteaders
Send Mail to:
PREPSTEADERS
525 Royal Parkway 292312
Nashville, TN 37229
Special thanks to ChristosFilms.com for filming & editing our videos!
Panasonic DMC-GH5 Camera we use: https://amzn.to/2ueeZiS
As an Amazon Associate I earn from qualifying purchases.
#SHTF, #TEOTWAWKI, #Survival, #Outliveyourlife, #shakedown, #PREPSTEADERS, #prepsteading, #prepare, #homesteading, #PS27, #Wisdomcreek
